Reverse Proxy on Oracle VPS with Traefik

1 - How I Built My Own Server Using Local and Cloud Resources
2 - Deploying containers via Cloudflare Tunnel (Zero Trust)
3 - Reverse proxy on Oracle VPS with Traefik
4 - Encrypted Server Backups to S3 with Duplicati
In the previous part, we transformed a set-top box (STB) into a personal Docker server, complete with Portainer and Cloudflare Tunnel.
Now, let’s take it a step further.
In this part, we’ll set up a Reverse Proxy using Traefik on an Oracle Cloud Free Tier VPS (or any VPS). This allows us to publicly expose any containerized app with SSL (HTTPS) using Cloudflare — without relying on a Cloudflare Tunnel.
This setup is perfect for those who want direct access via public IP, fine control over reverse proxy routing, and enhanced flexibility with SSL/TLS cert management.
Requirements
Before we begin, make sure you already have:
- A Cloudflare account
- An Oracle VPS (Free Tier) with public IP address, and Docker installed.
If you don’t have one, follow this step-by-step guide: Oracle Free Tier Setup by Tomasz Dunia
- A registered domain, added to your Cloudflare dashboard
It doesn’t have to be registered through Cloudflare, just ensure the nameservers point to Cloudflare. You can search online for domain registration and setup help.
The Oracle Cloud Free Tier provides generous resources — 4 OCPUs, 24 GB RAM, and 200 GB Storage. You're allowed to deploy multiple instances as long as you stay within these limits. If you exceed them, you will be charged.
Be aware that Oracle may automatically stop or remove your Always Free instances if they appear unused. According to Oracle’s official documentation, if all three of the following are true during a 7-day period, your instance could be reclaimed:
- CPU utilization (95th percentile) is below 20%
- Network utilization is below 20%
- Memory utilization is below 20% (A1 shapes only)
Just make sure you're using your instance actively — even light usage should keep it safe.
Step 1: Point Domain to VPS Public IP
- Go to your Cloudflare dashboard
- Select your domain
- Navigate to the DNS tab
- In the "DNS Management" section, add the following two records:

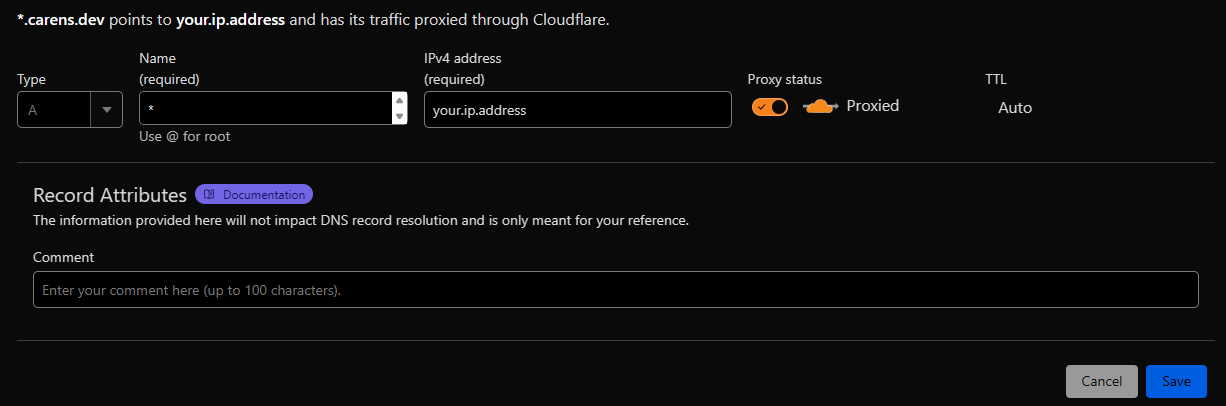
Both should be of type A — one with @ for the root domain (domain.com), and one with * for all subdomains (*.domain.com). Replace your.ip.address with your actual IP address.
Save it, and it should look like this:

Step 2: (Optional) Generate and Save Cloudflare Origin Certificates
In this tutorial, I will use a certificate from Cloudflare, but you can skip this step if you prefer to use Let’s Encrypt instead.
- Go to SSL/TLS → Origin Server
- Click Create Certificate
- Configure it as shown, then click Create
- You will be given two certificates:
- One for the certificate (save it as a
.pemfile on your server — just copy and paste) - One for the private key (save it as a
.keyfile on your server)

Step 3: Configure How Cloudflare Encrypts Traffic
In this step, we’ll ensure that Cloudflare communicates with our server using HTTPS only.
- Go to SSL/TLS → Overview.
- Set the SSL/TLS encryption mode to Full.

Step 4: Setup Traefik Reverse Proxy
Before we begin, make sure you have opened port 443 (and 80 if you want to) on your Oracle VPS and firewall. If you haven’t done this yet, follow the tutorial in the link provided above, under the “Opening ports” section.
Step 1. Create Docker network
docker network create public-netStep 2. Create a folder with the following format
traefik
├── certs
│   ├── your-private-key.key
│   └── your-cert.pem
├── docker-compose.yml
├── dynamic
│   └── basicauth.yml
└── traefik.yml
Here’s the example config for each file:
docker-compose.yml
services:
  traefik:
    image: traefik:v3.0
    container_name: traefik
    ports:
      # - "80:80" # uncomment this line if you need 80 port open
      - "443:443"
    volumes:
      - "./traefik.yml:/etc/traefik/traefik.yml:ro"
      - "./certs:/certs:ro" # comment this line if you want to use lets encrypt
      - "./dynamic:/etc/traefik/dynamic:ro"
      # - "./acme.json:/acme.json" # uncomment this line if you want to use lets encrypt
      - "/var/run/docker.sock:/var/run/docker.sock"
    networks:
      - public-net
    labels:
      - "traefik.enable=true"
      - "traefik.http.routers.traefik.rule=Host(`traefik.doman.com`)"
      - "traefik.http.routers.traefik.entrypoints=websecure"
      - "traefik.http.routers.traefik.tls=true"
      - "traefik.http.services.traefik.loadbalancer.server.port=8080"
      - "traefik.http.routers.traefik.service=api@internal"
      - "traefik.http.routers.traefik.middlewares=basic-auth@file"
networks:
  public-net:
    external: true
basicauth.yml
http:
  middlewares:
    basic-auth:
      basicAuth:
        users:
          - "<YOUR_USERNAME_AND_PASSWORD>"
    default:
      chain:
        middlewares:
          - default-security-headers
          - gzip

    secHeaders:
      chain:
        middlewares:
          - default-security-headers
          - gzip

    default-security-headers:
      headers:
        browserXssFilter: true
        contentTypeNosniff: true
        forceSTSHeader: true
        frameDeny: true
        stsIncludeSubdomains: true
        stsPreload: true
        stsSeconds: 31536000
        customFrameOptionsValue: "SAMEORIGIN"
    gzip:
      compress: {}
Replace <YOUR_USERNAME_AND_PASSWORD> with the output generated by the following command:htpasswd -nb your_username your_password
# the output can be something like
your_username:xxxyourhashedpasswordxxxtraefik.yml
entryPoints:
  #web:
  #  address: ":80" # uncomment this section if you want to open 80 port
  websecure:
    address: ":443"
    transport:
      respondingTimeouts:
        readTimeout: 600s
        idleTimeout: 600s
        writeTimeout: 600s
  metrics:
    address: ":9100"

api:
  dashboard: true
  insecure: false

global:
  checknewversion: true
  sendanonymoususage: false

# cloudflare cert, comment stores and certificates section if you want to use lets encrypt
tls:
  stores:
    default:
      defaultCertificate:
        certFile: "/certs/your-cert.pem"
        keyFile: "/certs/your-private-key.key"
  certificates:
    - certFile: /certs/your-cert.pem
      keyFile: /certs/your-private-key.key
  options:
    default:
      minVersion: VersionTLS12
      cipherSuites:
        - TLS_ECDHE_RSA_WITH_AES_128_GCM_SHA256
        - TLS_ECDHE_RSA_WITH_AES_256_GCM_SHA384
        - TLS_ECDHE_RSA_WITH_CHACHA20_POLY1305
        - TLS_AES_128_GCM_SHA256
        - TLS_AES_256_GCM_SHA384
        - TLS_CHACHA20_POLY1305_SHA256
      curvePreferences:
        - CurveP521
        - CurveP384
      sniStrict: true

providers:
  docker:
    exposedByDefault: false
  file:
    directory: /etc/traefik/dynamic
    watch: true
  providersThrottleDuration: 10

metrics:
  prometheus:
    addEntryPointsLabels: true
    addServicesLabels: true
    entryPoint: metrics

# letsencrypt setting, uncomment this if you want to use lets encrypt
#certificatesResolvers:
#  myresolver:
#    acme:
#      email: [email protected]
#      storage: acme.json
#      httpChallenge:
#        entryPoint: web
If everything is ready, just run the command inside the traefik folder.
docker compose up -dYour Traefik reverse proxy should be up and running successfully.
Step 5: Deploy Example App (Nginx)
Now we’re ready to deploy our first app — for example, Nginx.
Create another folder outside the traefik folder, and create a docker-compose.yml file by running:
nano docker-compose.yml Then fill it with the following content:
services:
  app:
    image: nginx:latest
    container_name: nginx
    networks:
      - public-net
    labels:
      - "traefik.enable=true"
      - "traefik.http.routers.nginx.rule=Host(`mynginx.domain.com`)"
      - "traefik.http.routers.nginx.entrypoints=websecure"
      - "traefik.http.routers.nginx.tls=true"
      - "traefik.http.services.nginx.loadbalancer.server.port=80"
      # uncomment this below if you use lets encrypt
      # - "traefik.http.routers.nginx.tls.certresolver=myresolver"

networks:
  public-net:
    external: true
Now run it using:
docker compose up -dYour Nginx app should now be accessible at:https://mynginx.domain.com

Conclusion
Now you have a fully functional reverse proxy with SSL, domain routing, and Dockerized apps — all running on a free VPS from Oracle Cloud.
You can now deploy as many apps as you want, using subdomains with full HTTPS coverage and easy container-based control.
Member discussion